Build your own
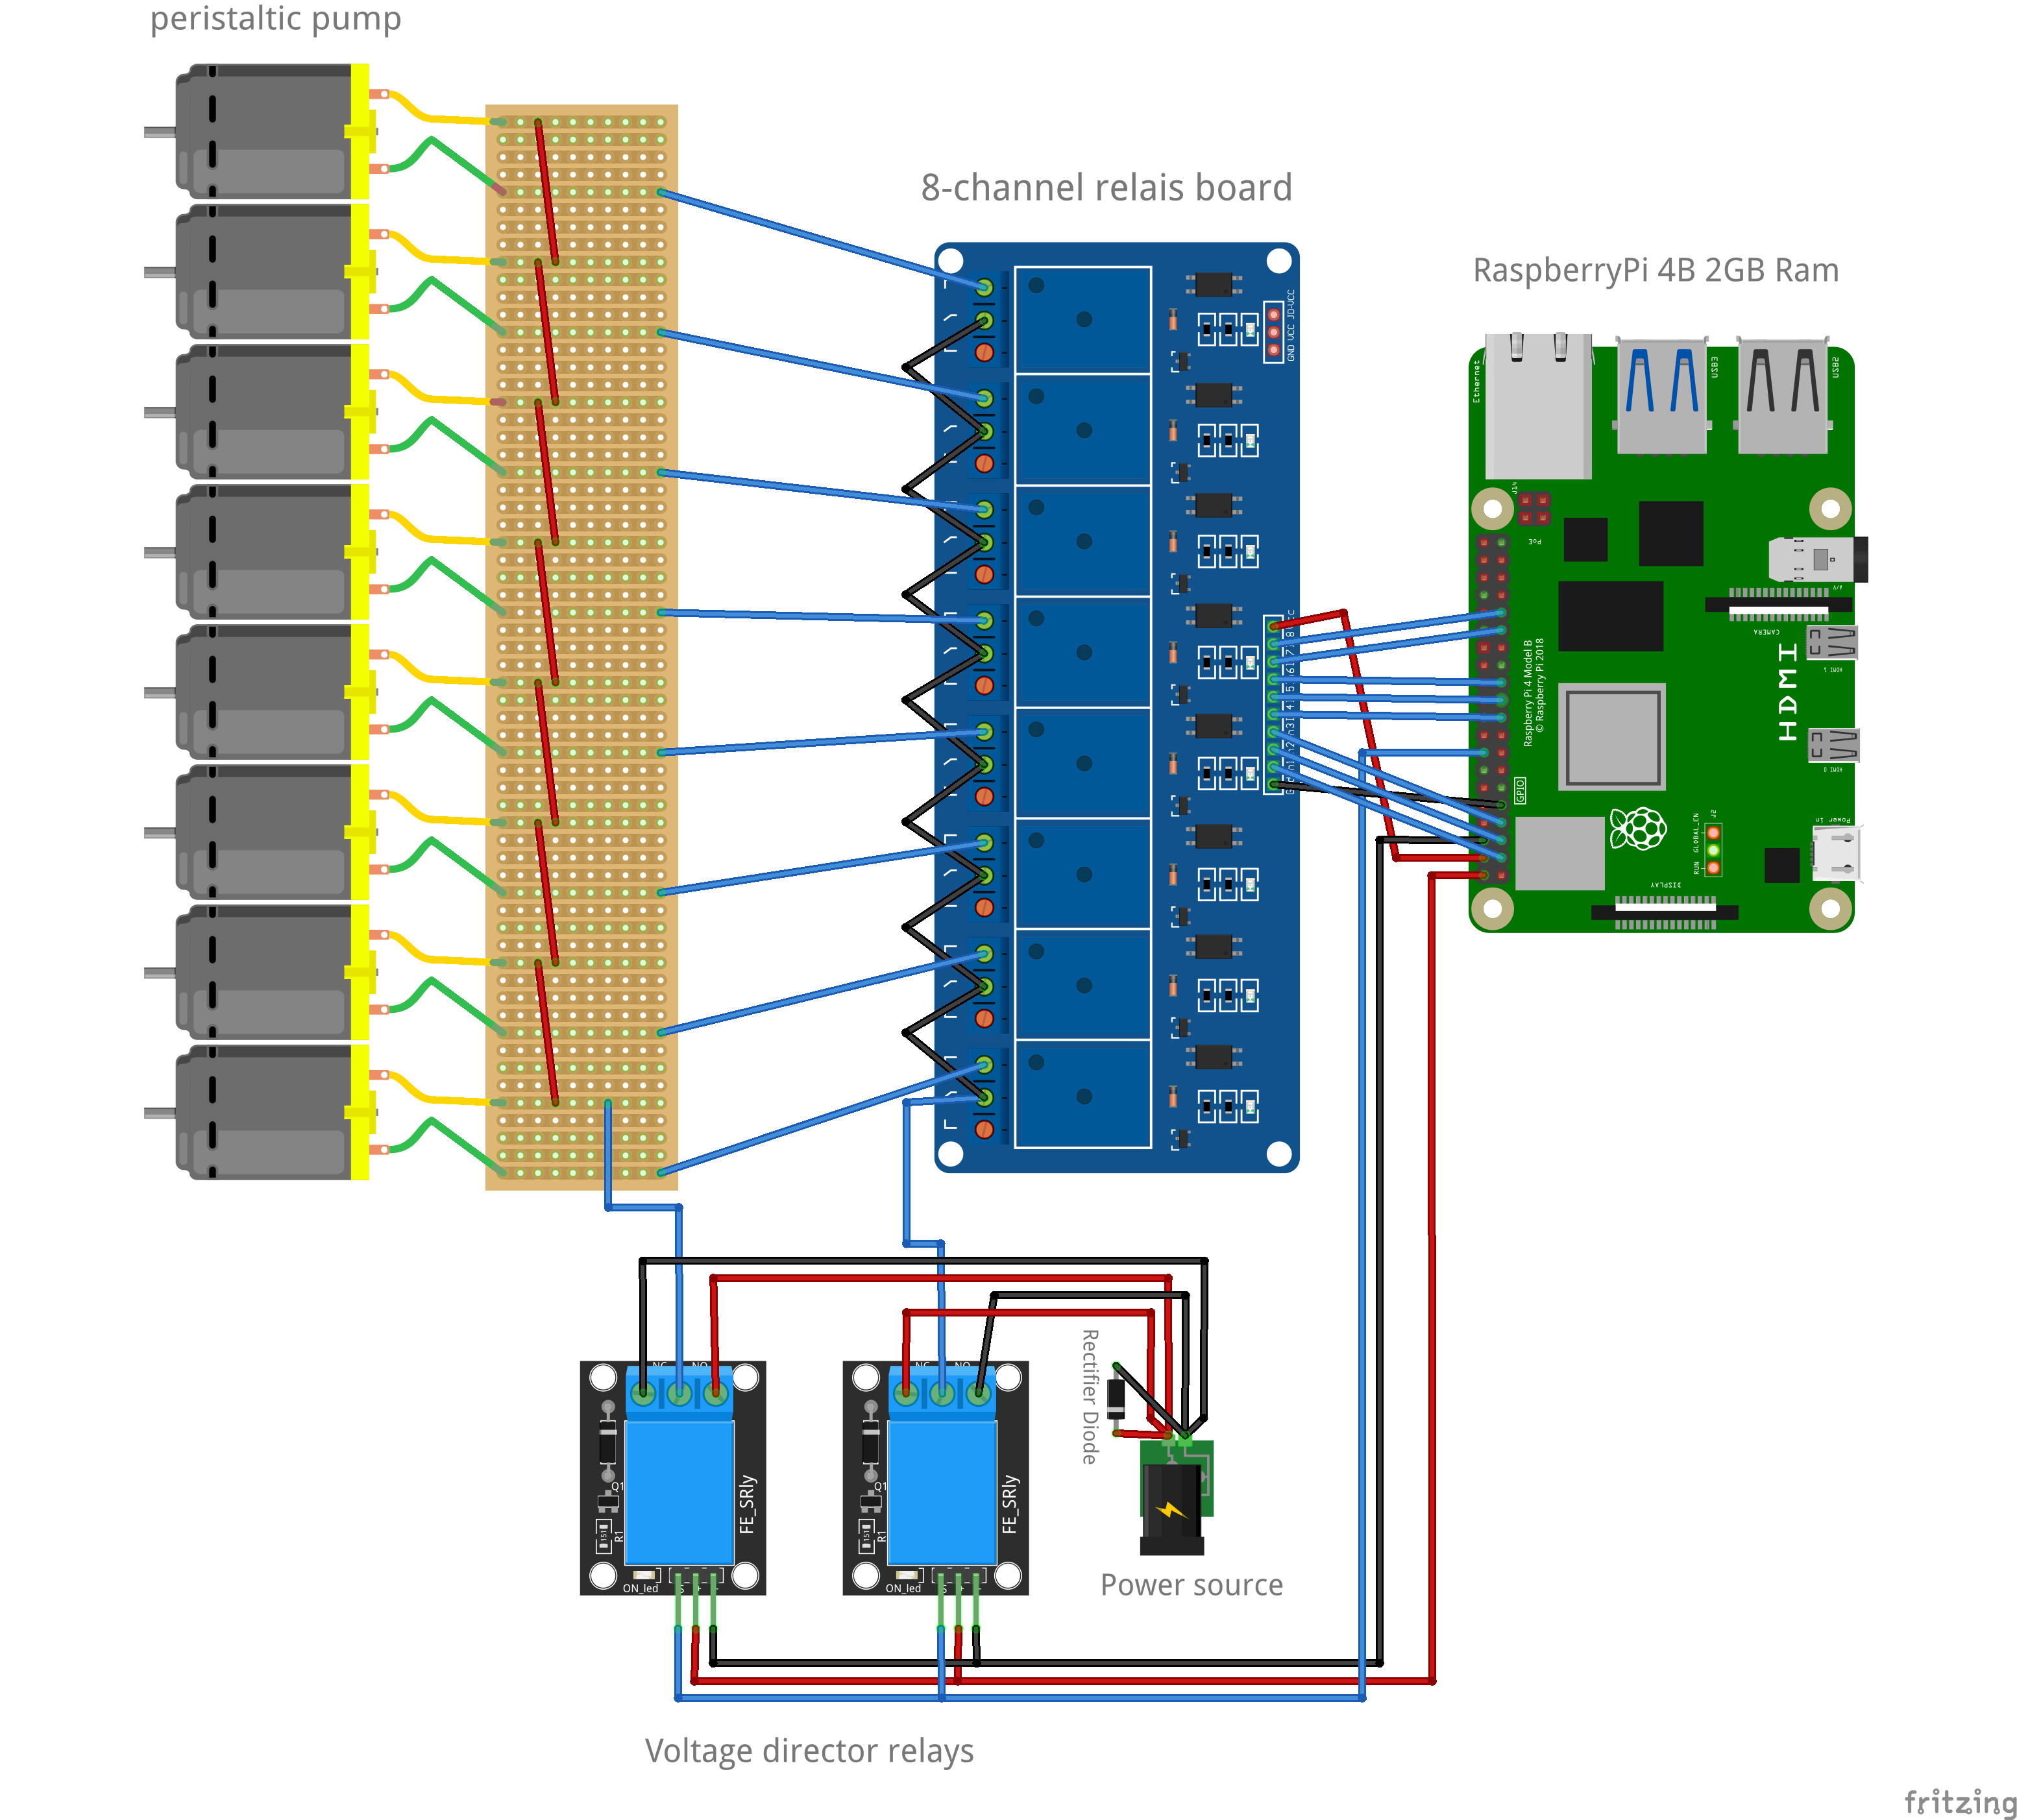
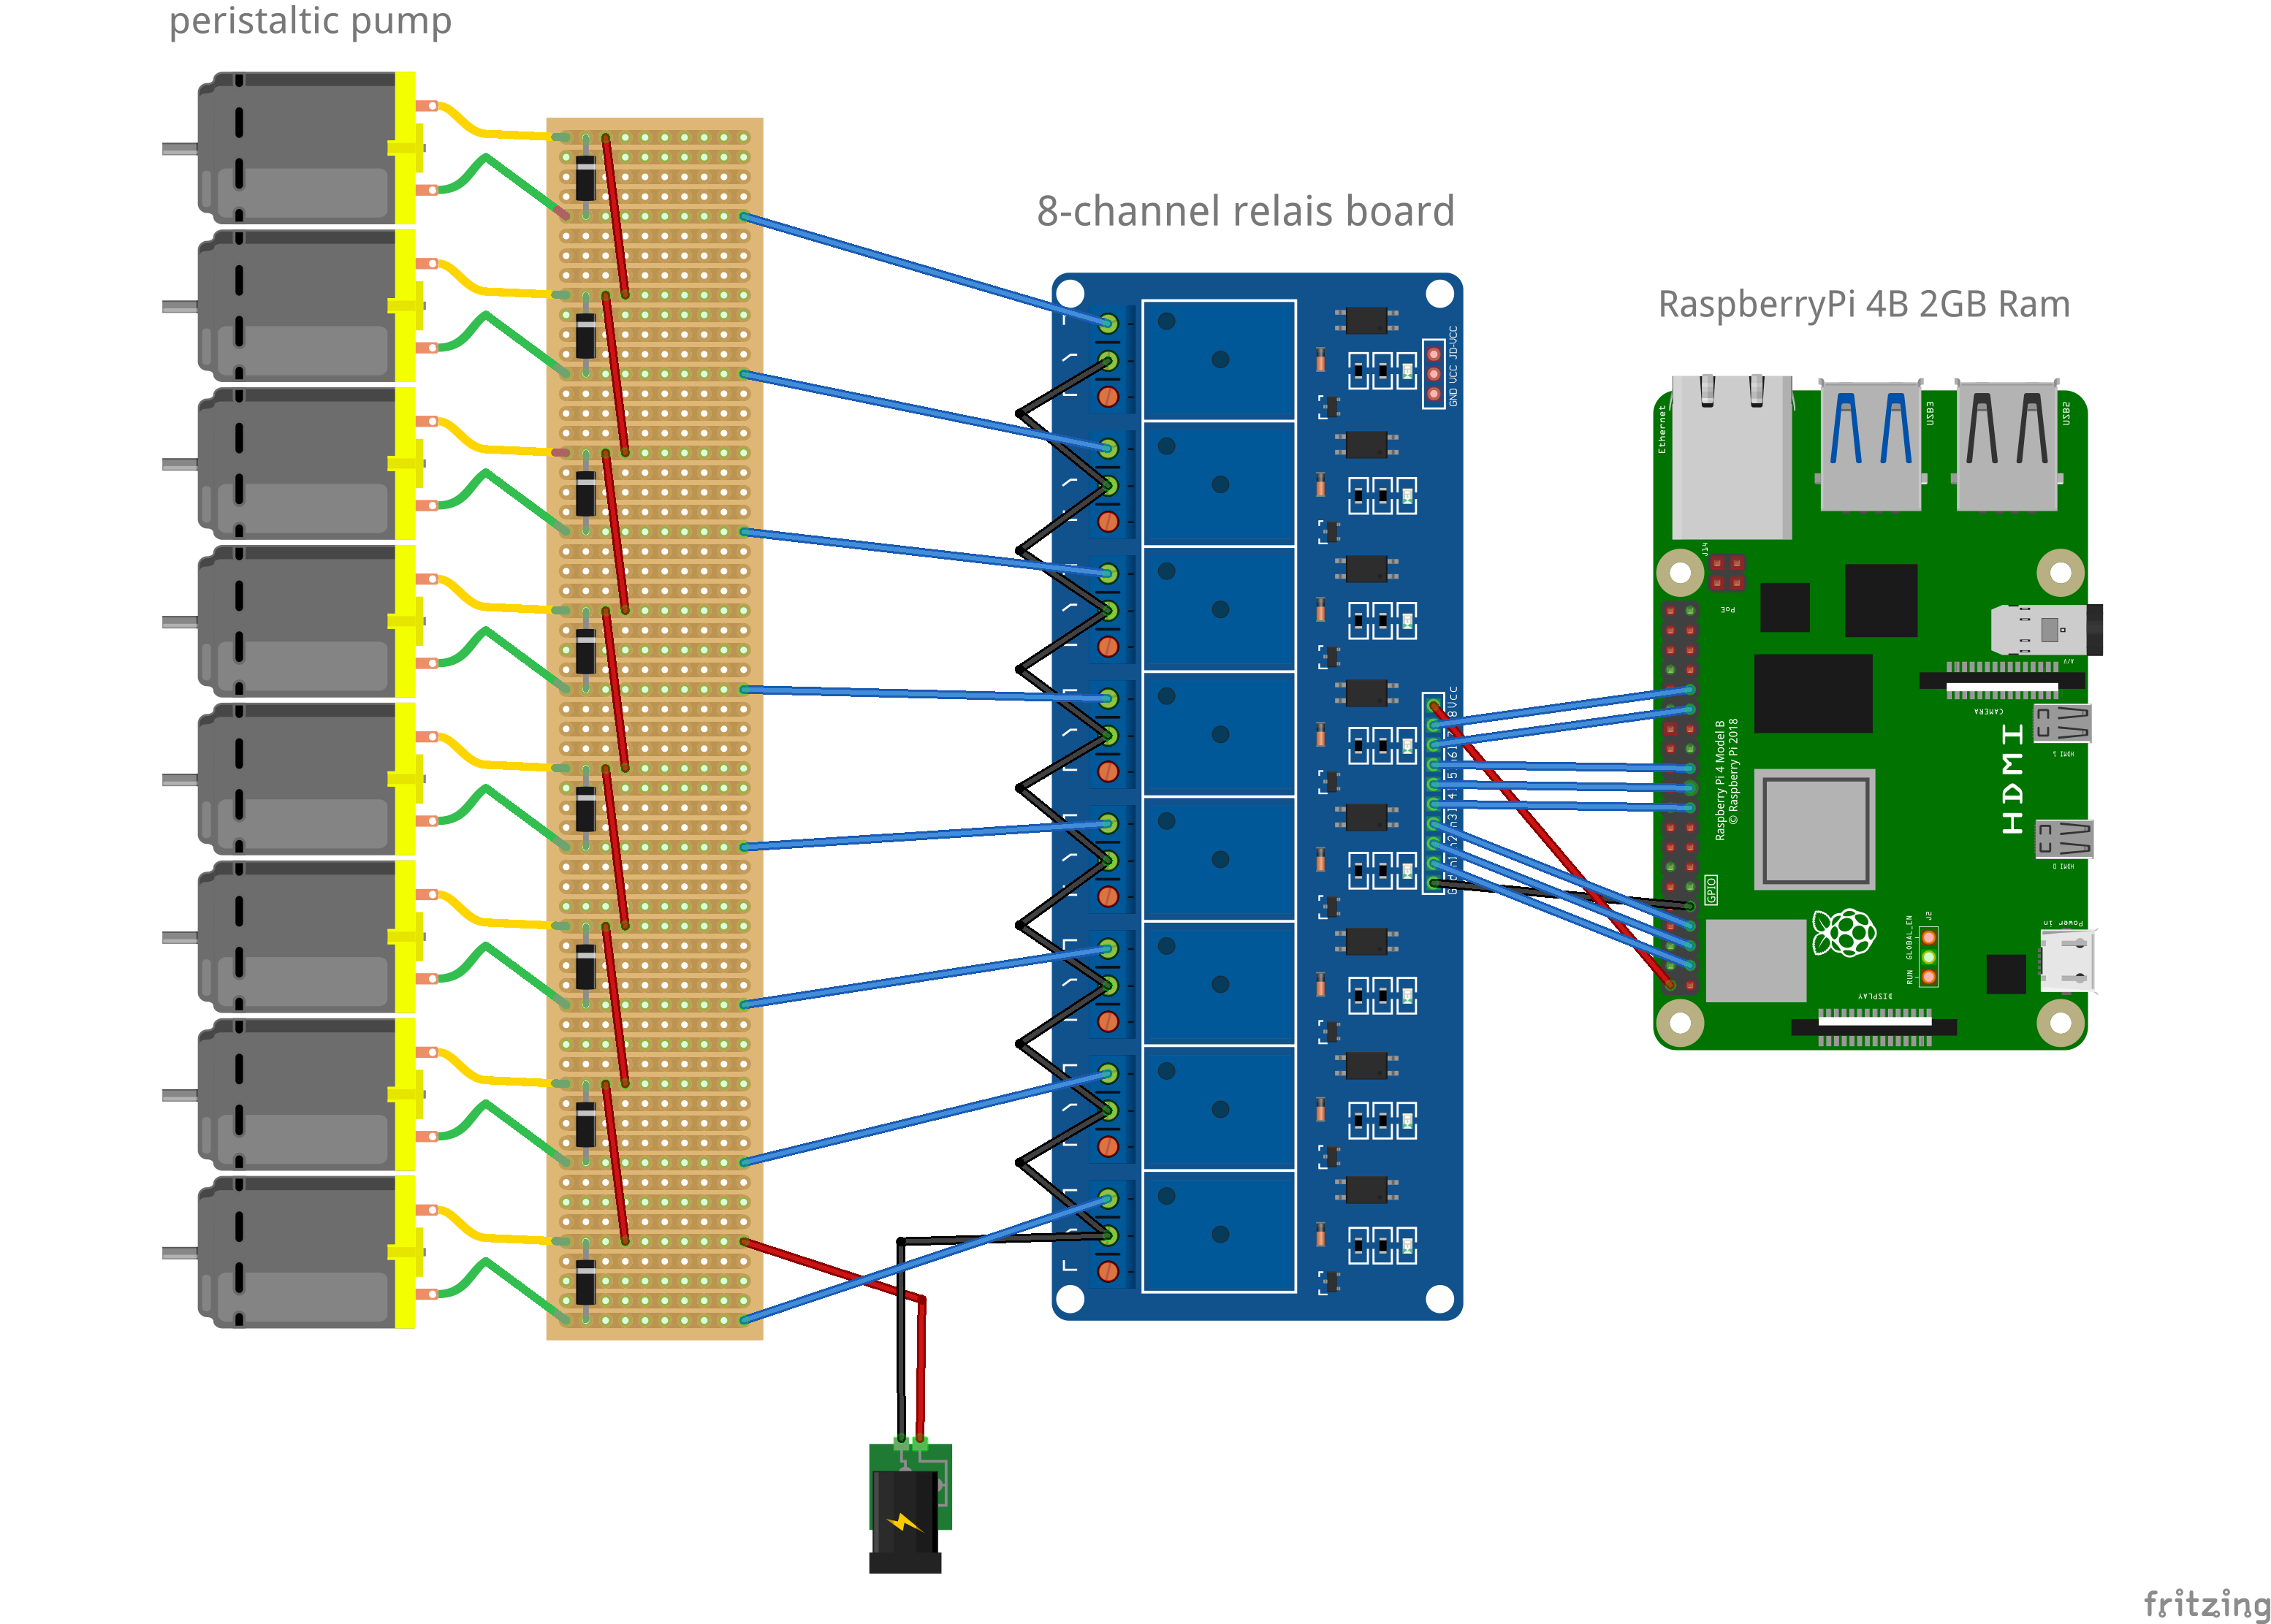
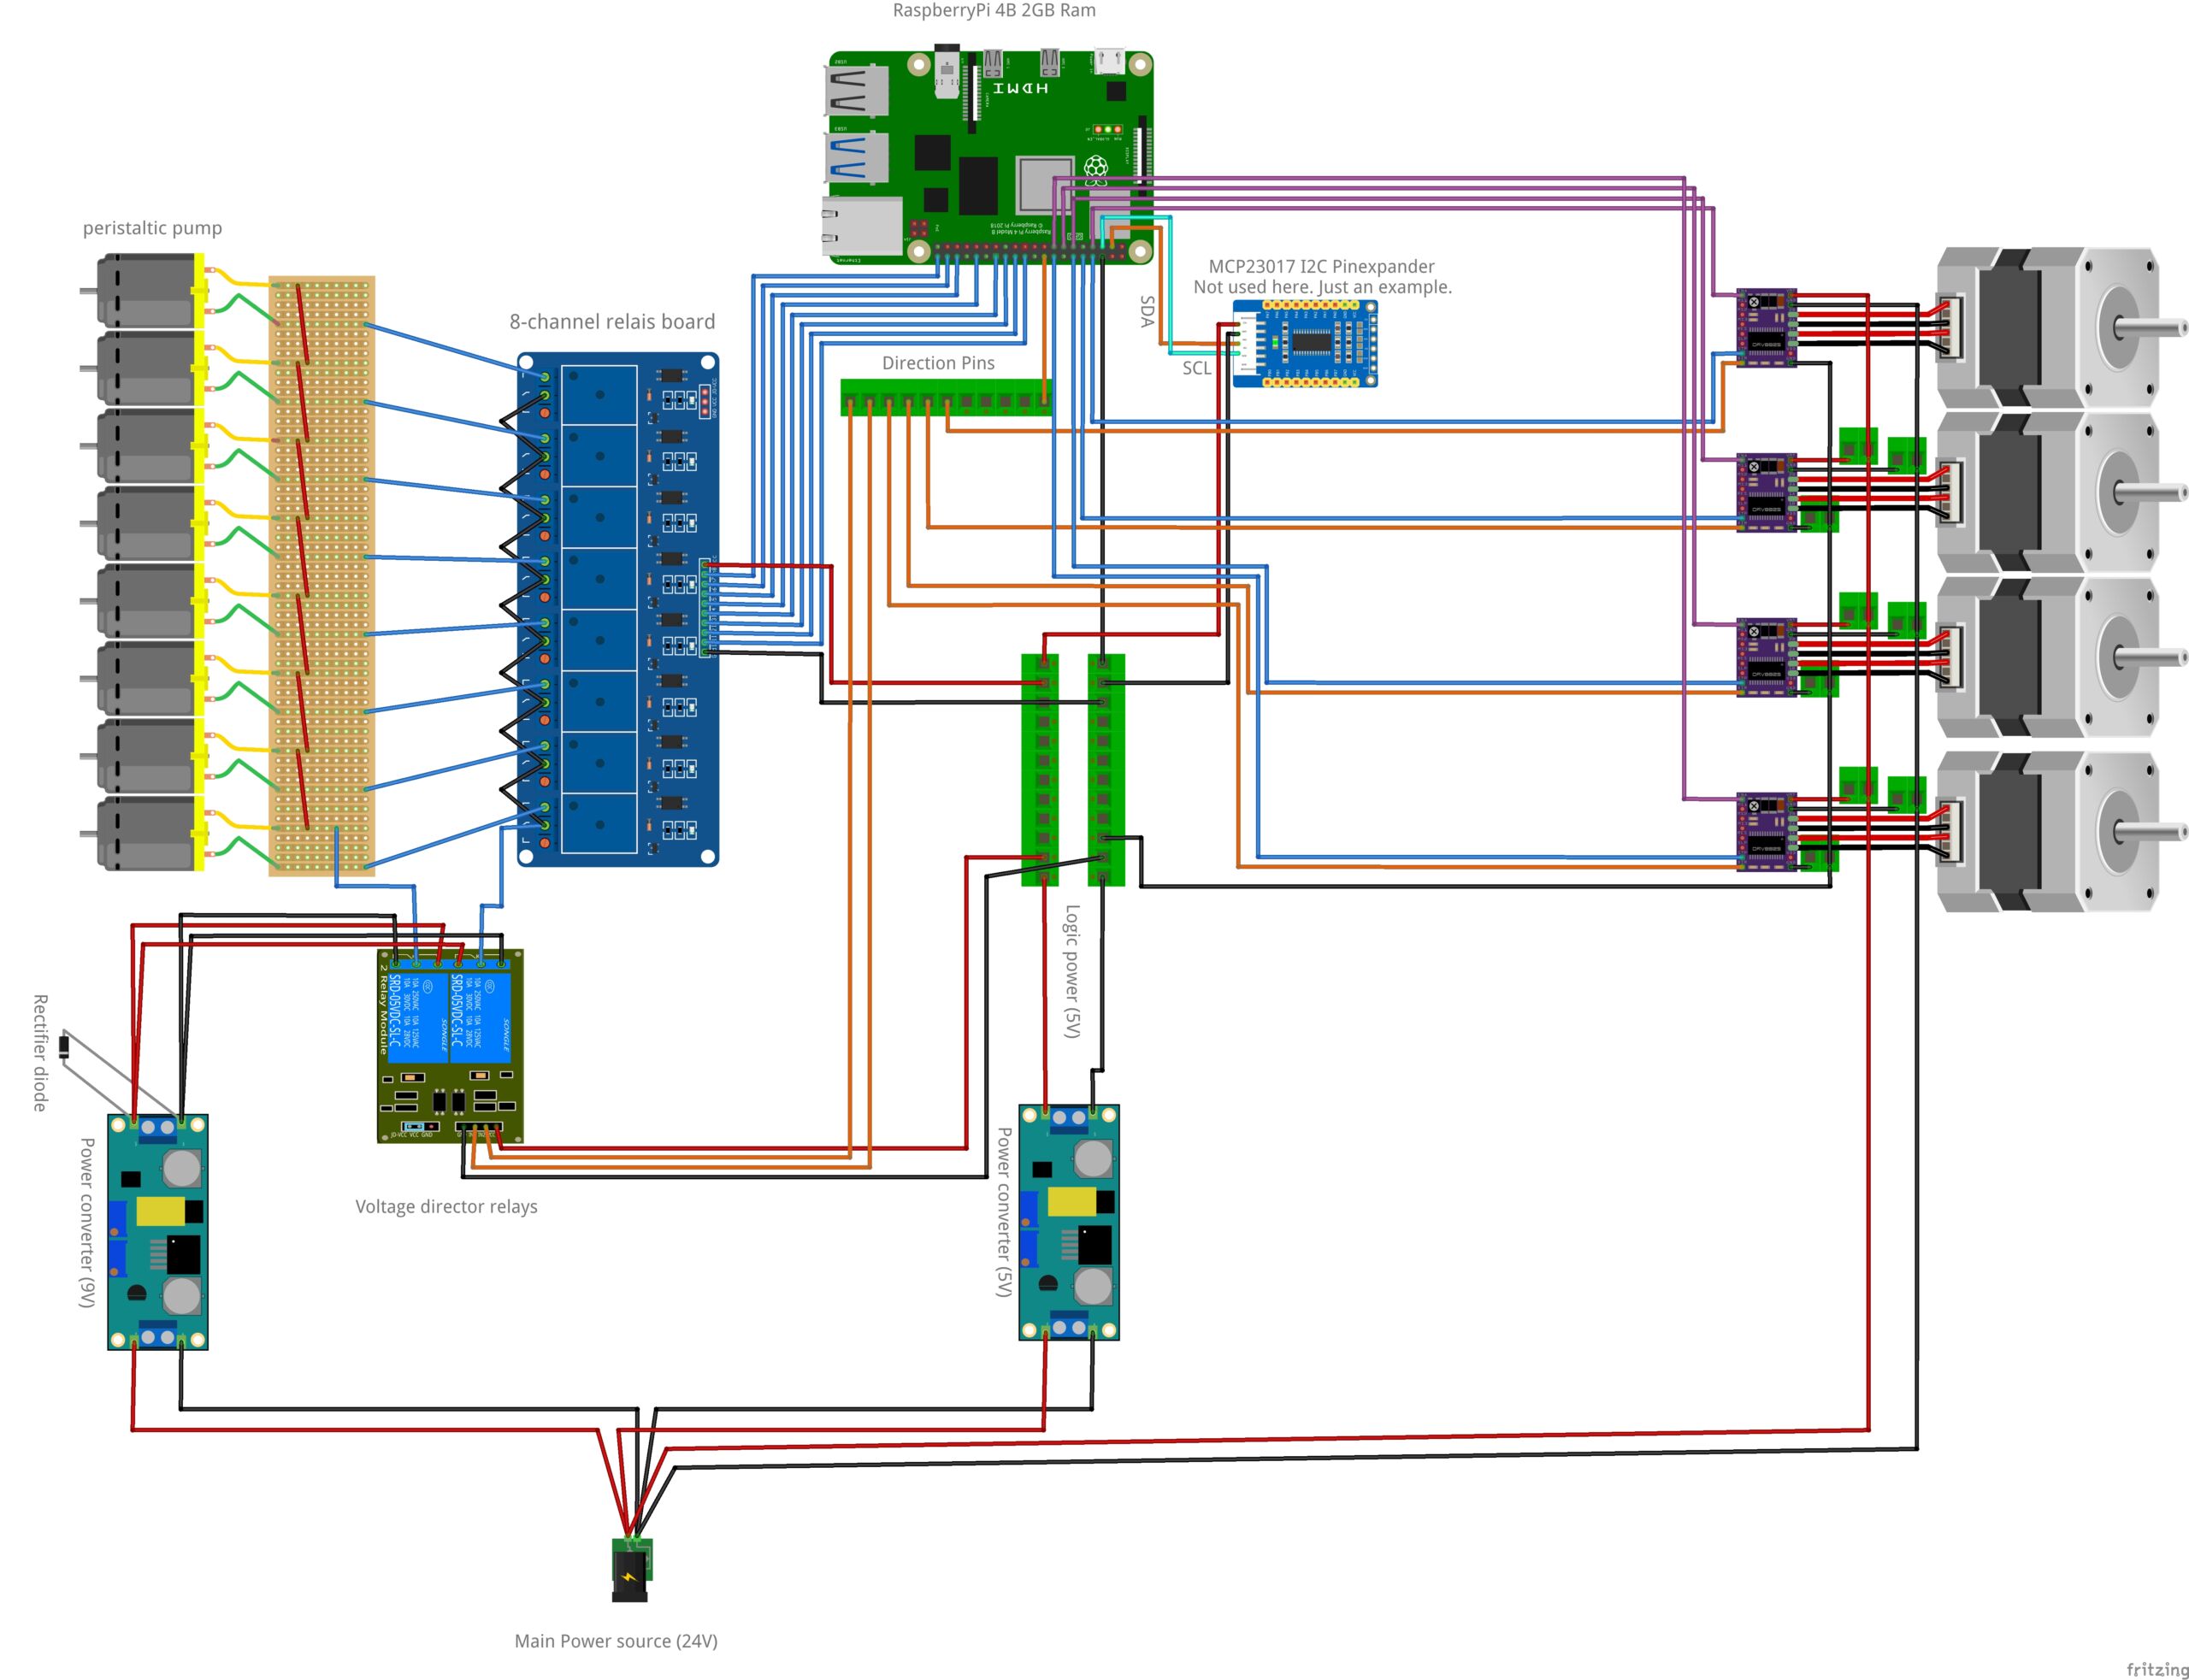
Here you find a list of hardware that you might what to use to build your machine. Not all components are required. The hardware that you have to pick depends on your planned setup. You can find three blueprints at the bottom of the page that you can use as a reference. Pay special attention to power supplies. Make sure that the pumps and power supply that you select are compatible. Use voltage converters if needed. Please note that your setup strictly needs to use a RaspberryPi. Other platforms like NanoPi or BananaPi are not supported!
After you’ve finished your hardware setup or if you first want to try out the software on your own RaspberryPi, you can continue with the installation of CocktailPi:
Blueprints
The following blueprints show some example setups , that you don’t have to stick to. Please note that hardware and blueprints are provided without warranty!
Basic setup with reverse pumping
This is a similar setup to the Basic setup above, but this one contains two relays that can be used to reverse the direction of the voltage to which the pumps are connected. This allows the software to make the pumps run in the opposite direction. This is useful if you want to pump leftover ingredients from the hoses of your machine back into their container.

Which pumps to use
Different pump types have different advantages and disadvantages. Depending on the requirements that you have for your machine, different pump types should be used. You can mix different pump types togehter within the same machine.
DC-Pumps
DC pumps are the go to solution for most people. Each pump is calibrated by measuring the time it takes to pump a reference volume of liquid. When dispensing a recipe, this time is then scaled for each ingredient. This is a cheap and straight forward solution, that works well with non-carbonated ingredients. DC and stepper pumps can run simultaneously, which speeds up drink production time. You shouldn’t use them to pump carbonated ingredients, as they work with underpressure, which removes much of the carbon.
My recommendation is to use DC pumps for non-carbonated ingredients that make up a larger proportion of the drinks being dispensed. Example: Juice, Sprits
Stepper-Pumps
Stepper pumps use a stepper motor and allow very precise fluid delivery. Stepper motors are often used in 3D printing and other applications where it is important to be able to control a motor to a small fraction of a revolution. Stepper motors are controlled by a stepper driver connected to Cocktailpi. Depending on the configuration of this driver, one revolution of the motor usually corresponds to 200 or more so-called steps. Cocktailpi can tell the stepper motor driver to make the motor take a certain number of steps and thus control the motor down to a fraction of a turn. For example, 200 steps per revolution would give a resolution of 1.8°.
Stepper motors can be run in parallel with other stepper motors and DC pumps. However, they are expensive and often slower than DC pumps. You also shouldn’t use them to pump carbonated ingredients, as they work with underpressure, which removes much of the carbon. My recommendation is to use stepper motors together with small diameter tubing and pump ingredients that you want to pump very accurately. Example: Lemon/lime juice, bitters.
Valves
Valves are the solution for dispensing carbonated ingredients. They work by blocking or releasing liquid from a pressurised container containing the liquid to be dispensed. When the valve is opened, the liquid is forced through the tubing and valve into the glass. The glass is placed on a load cell which measures the weight of the liquid dispensed and provides this measurement as feedback to Cocktailpi. When the desired amount of liquid has been dispensed, the valve is closed. Due to the load cell, which can only provide feedback to one dispensing unit at a time, valves can’t be used in paralell with DC pumps and stepper pumps. Ingredients pumped by valves are always added sequentially to the end of a production step. You also need to find a way to pressurise the liquid container or otherwise make the liquid flow through the tubing when the appropriate valve opens. Valves also can’t pump backwards, which means that liquid that’s in the tube can’t be pumped back into its container.
My recommendation is to use valves for carbonated ingredients such as soda and cola, but you can also use them to dispense regular juices and spirits.
Comparison table
| DC-Pump | Stepper-Pump | Valve | |
|---|---|---|---|
| Cheap | Yes | No | Yes |
| Concurrent dispensing | Yes | Yes | No |
| Exact to fractions of a rotation | No | Yes | No |
| Carbonated ingredients | No | No | Yes |
| Don’t require load cell | Yes | Yes | No |
| Don’t require pressurized container |
Yes | Yes | No |
| Pump backwards | Yes | Yes | No |
Hardware list
Here you find a list of hardware components, that you might want to use for your setup. Please note that hardware and blueprints are provided without warranty! Most of the parts listed here can be found on both AliExpress and Amazon.
Basic hardware
- 1x RaspberryPi: <Amazon>
- 1x Relay-Board: <Amazon>
- 8x Dosing pumps: <Amazon> <AliExpress>
- 8x Diodes (reverse current diodes)
- 1x Power supply (Select a power supply suitable for your pumps and power consumption.):
- Silicone hose: <Amazon>
- Cables
- Make sure to pick cables that are strong enough for your application. (Cable cross section)
Fancy stuff
Faster pumps:
- 12V/24V Dosing pump: <Amazon> <AliExpress>
Stepper pumps:
- Stepper motor pump: <Amazon> <Aliexpress>
- The stepper motors should work with 12V, but I would recommend to power them with 24V.
- Stepper motor driver: <Amazon> <AliExpress> (1 per stepper motor)
- Stepper motor driver board: <Amazon> <AliExpress> (1 per stepper motor driver, optional)
Power supplies:
- 5V step down power supply: https://amzn.to/3PraKY2 (for the raspberry)
- 12V power supply: <Amazon> (Can be used with 12V pumps)
- 12V power stabilizer: <Amazon> (Can be used to power the machine by battery)
- 24V power supply: <Amazon>
- 0-24V adjustable power supply: <Amazon>
- Voltage converter / Power buck: <Amazon>
Other:
- Touchscreen 7 inch: <Amazon>
- 16-Pin I2C GPIO expander: <Amazon>
- 1, 2, 4, 8 or 16-Channel Relay-Board using I2C: <AliExpress>
- 16-Channel Relay-Board: <Amazon>
- The raspberry Pi only has 3.3V GPIO-Pins, but this relay board needs 5V on its pins to trigger the relays. This can help: <Amazon>
- 2-Channel Relay-Board: <Amazon> (Voltage director relays for reverse pumping)
- Rectifier diode: <Amazon> (If you use the power supply and the power stabilizer)
- LAN-Cable box: <Amazon> (For the case)


